Saturday, August 16, 2014

Scale Identification Practice

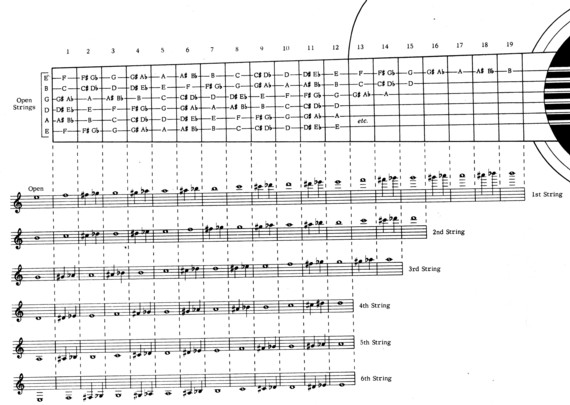
Source: http://www.learn-classical-guitar-today.com/images/NotesOfTheGuitar_ALL.jpg

Some of my students right now are working on some really important skills that will help them better play music with others, write songs, or just plain understand the guitar as a whole. Being able to identify, locate, and play scales all over the neck is an essential part of playing guitar.

When it comes to honing this skill, nothing does the job better than randomly calling out fret/position numbers, keys, forms, or finger roots. It's difficult to make sure you cover it all (all forms in all keys), and it might not even be necessary; but the important things are being able to proficiently "use your dots" as a tool to quickly locate root notes, then, identify form root fingers, and recall the forms themselves. If you were to practice your way through every variable in this exercise, you'd play a over 300 scale patterns, total!

To help you practice, I've created a nice little worksheet which you can download. It's pretty straight forward. All you do is fill in the blanks. Once you get the hang of this sort of thing, you should be able to fly. And, you can easily create your own worksheet to get through all 12 keys in all 5 forms, both major and minor, for pentatonics, 7-tone scales, and harmonic minor scales, varying all five of the blanks on this worksheet!


I'll soon post the answer key.

Tuesday, July 22, 2014

Pentatonic Scale Exercises: 3's

At a recent lesson, my student and I ran out of time and I promised her that I'd write a post here, providing some guidance for her next step. Here's what we're working on...

Major and minor pentatonic scales are fundamental to any guitar player. They're one of the first things a player will learn, and they are the gateway into the world of blues and rock guitar solos. If you're serious about guitar, you know these well.

So you've got all five box patterns memorized. Now what?

There are a number of scale exercises that can be applied to any scale we learn, and the first step is to learn the three, most basic ones. A scale exercise is simply a pattern of notes within the scale designed to improve a player's skill. Today, we'll cover what I call "3's".

In the examples below, we're playing Form 1 in second position, in the key of A minor. (Form 1 is the 2-4, 2-4, 1-4, 1-4, 2-4, 2-4 fingering pattern.) This exercise is quite simple, really.

3's can be described as follows: Play three ascending notes, go back one note. Using the note you went back to as "1", play three more ascending notes, etc. (The pattern is reversed when descending.)

Here are a few rules:

1. Every finger gets a fret.
2. Alternate picking (down-up-down-up)
3. Use a metronome
4. Each note receives the same duration (eighth notes, to start)
5. Always start and end on the root note

Take a listen...

And here's the sheet music that corresponds to the audio above...


Notice this pattern is ascending. We also have to remember to practice our 3's descending as well. You'll see that you naturally have to turn around once you get to the highest note of the pattern. Stop on the highest note after completing the last ascending pattern grouping possible. Once you're there, start a new group of three notes and descend away, all the way to the lowest note within the form. Then, turn around again (and ascend with 3's back to the root). Always start and end the exercise on the root note.

Here's an audio example of the entire exercise...

So why do we use and learn scale exercises? Because they allow players to improve their muscle memory, tonal memory, and increase speed and accuracy when playing single notes. In addition, these exercise patterns are also commonly found in popular song guitar solos.

Cheers! Keep on playing.

Wednesday, September 11, 2013

Thank You! Kickstarter Successfully Funded


Thank you so much for supporting my music! Yes, this is my guitar lessons blog, and I usually don't post things like this; however, a fair number of you, my students, have supported Restoration Project's Firm Foundation Kickstarter project, and I want to say thank you, thank you, thank you!

The grand total raised over our 30-day campaign (including non-KS other cash gifts) was $11,270!

Learn more about our series at resproj.com/ffhymns.

Saturday, August 10, 2013

C Minor Bar Chords and Inversions

This post is for a former student of mine, Steve, whom I told I would write up this special post for him a few weeks after our last lesson together at JC's Guitars in Saint Charles, IL. (More on my leaving coming in an upcoming post over here.)

This lesson is not for beginners.

The worksheet reads left to right, then down a row, etc.

There are ten minor bar/inversion shapes which follow the pattern for the major ones. Simply locate the thirds within the Major shapes and lower them 1/2 step in order to get the minors. However, shapes 1, 4, and 9 are unique to minors, with 1 and 9 essentially being the same, just one octave apart.

By this point in your training, you understand how to check each chord to make sure each note is ringing properly. You also know how to practice increasing your speed between shapes over time. And, of course, you always use a metronome. My favorite basic metronome app for iOS? Bitcount's Clockwork. But if you're looking for one that will gradually increase in tempo as you rehearse difficult passages, you may want to check out Metronome+ (though I very much dislike apps with in-app purchases) or go with the ridiculously robust Dr. Betotte by S'SWorks and pay $10 up front instead of through in-app purchases, like M+.

One more thing to remember: You have to practice these chords ascending and descending as well as in every position, with different roots.

There are two ways you can practice these (other than the simple straight up and down):

1. Pick a position first. Randomly name a minor chord root. Find the shape that fits your root note and position, plus or minus one fret. Then, play all of the shapes you can with that root note, ascending in order, then descending past your original shape, if possible.

2. Pick a shape first. Randomly name a minor chord root. Find the position which matches the chord and root note which you randomly selected. Then, play all the shapes you can. Maybe this time play the shapes below your starting shape first, then ascend past the original, as high as you can go.

Questions? Comment below.

Happy minor chord playing!


Disclaimer: All resources on this blog are intended for personal use only. If you are a music instructor - public or private - and would like to use some of the resource materials I have created, please contact me to get permission before using them with your own students.

Donate Today to My Kickstarter Campaign!


Yesterday, on Friday, August 9, 2013, my friends and I in Restoration Project launched our first-ever Kickstarter campaign. We're trying to raise $10,000 in 30 days to pay for the recording and production costs for a new EP series we're calling Firm Foundation.

Watch our campaign video and view our Kickstarter page here:

http://kck.st/13SvBmM

Our Firm Foundation recordings will feature Sunday School songs with new arrangements and lyrics—bringing greater theological depth and clarity to the originals you may already know. Just read about it, watch the video, and donate on our campaign page! It's better watched than described.

Learn more about Restoration Project's mission and history and listen to our two, previously released albums on our website: http://resproj.com.

You can also share our fundraiser on social:

Share to Twitter
Share to Facebook

Thanks for your support!

Wednesday, August 7, 2013

Sight-Reading for Guitarists

One of the most important skills a guitarist can possess is the ability to read music.

I've said it. I mean it.

Great guitarists don't need to know how to read music, but well-rounded ones do - especially when it comes to comparing musicians of other instruments. Guitarists are the target of a lot of snobbish derision when it comes to their abilities to sight-read. But if we can read music, then we get the best of both worlds: playing from the heart (without music) and playing with precise calculation and technique (reading music).

I owe a big apology to one of my former guitar students, for whom I was supposed to write this special blog post a few days ago. This one is for Joe.

The attached image can be used for sight-reading in any position. Don't memorize it. When you feel like you're starting to get familiar with the order of the notes, flip the sheet upside down. Voila! It's a new page to practice. Here are the most important positions and keys to start with:
  • I - Keys: C, G, D, A, E, F
  • II - Keys: C, G, D, A
  • IV - Keys: D, A, E, B, F
  • VI - Keys: E, B, F
  • X - Keys: G, D, A, E
As you begin, start by reading a single note at a fairly slow pace. Consider each note head to be the same duration.

You're reading whole notes. When you feel comfortable with single notes, move on to reading two notes at a time. Now you're reading twice the information at one time, and you're reading half notes. I think you get the point. Increase the number of notes you read at a time. Some key benchmarks are as follows:
  • 3-note groupings - reading in 3/4
  • 6-note groupings - reading in 6/8
  • 8-note groupings - reading in 4/4
  • 12-note groupings - reading 4 measures of 3/4 at one time
  • 16-note groupings - reading 4 measures of 4/4 at one time
If you're hungry for more, and you're serious, you can write out your own pages, following mine as an example. In my page, I've limited my notes to C3 up to A4. However, the reading range for guitars goes down to E2 and all the way up to E6, approximately, so if you make your own practice sheets, be sure to utilize all of the pitches in your given fret position. (You won't be able to flip the sheet over when the notes become too familiar to "make" a new sheet, but it will give you the full range for guitarists.)

I have based my sheet on David Hickman's book, Music Speed Reading, which is out of print as of this post. Original copies of Hickman's book are currently fetching $150+ on Amazon.com.

Have any questions or comments? Please use the form below. And good luck!


Disclaimer: All resources on this blog are intended for personal use only. If you are a music instructor - public or private - and would like to use some of the resource materials I have created, please contact me to get permission before using them with your own students.

Sunday, April 28, 2013

Brad Paisley, Reverend Guitars, and Doug Seven


I've had an itch for about three months now to purchase a guitar capable of pulling some serious Southern twang (in the style of Brad Paisley). At this point, I feel like I really have two options:

A Reverend Buckshot or a Fender American Tele Deluxe. The next time I'm down out Chicago Music Exchange, there's a good chance that I'll be dropping either $750 or $1,700, depending on which of these two guitars I like the feel of more. Yeah, that's a pretty big price spread. But, more than anything, I want to get the right guitar. Sometimes it's not about price.

To prepare for my new purchase, I've been wanting to learn a few extra Paisley-esque licks. A quick search on Google this afternoon turned up a number of videos, and I decided to watch the one that looked the best from its screenshot. As it turns out, I stumbled upon a Southern dude named Doug Seven, who seems to have quite a reputation. Here's the video:

http://youtu.be/HavXOVP-3BQ

(The video is 15 minutes long, but the first 6 or so minutes will get you the bulk of the good stuff.)

If you're interested in this chicken pickin' style, Doug recommends picking up one of his books/DVD's - probably a worthy investment, based on what I've seen. So go check it out!

Also, I'm curious to see which Tele paint job you like best. Check out the current models and let me know which one you think I should get:

http://www.fender.com/series/american-deluxe/american-deluxe-telecaster/

Sunday, April 14, 2013

Lesson 2: How to Tune a Guitar (Relative Tuning)

Time and again I find guitar students who have no idea how to tune their instruments without plugging in to a guitar tuner. Private guitar teachers: this is your fault!

Usually at some point in the first month of lessons, I will teach all of my students what is called "relative tuning". That is to say, tuning so that the guitar will sound good by itself, without any other instruments playing with it. If you want to play with other musicians, you'll need to tune to "concert pitch", which is a standard tuning which all instruments follow in order to play together, in harmony.

If a guitarist is alone in the woods, can he still play his instrument "in tune" and sound great?

The essence of relative tuning is that each string on the guitar is tuned to properly relate, intervallically, to each other. In music theory terms, the interval between each neighboring string, with the exception of G to B, is a Perfect 4th. String G to B is a Major 3rd.

It's a lot easier to just show you what I mean (as opposed to trying to explain it in words, on a blog). So I'm just going to post my worksheet and let you figure the rest out on your own! If you have any questions or comments, please feel free to leave those below.

Don't forget, here's the link to my... post series on guitar lessons curriculum.


Disclaimer: All resources on this blog are intended for personal use only. If you are a music instructor - public or private - and would like to use some of the resource materials I have created, please contact me to get permission before using them with your own students.

Tuesday, February 19, 2013

Top 10 Practice Tips: Stick to the Plan (8 of 10)

"If you fail to plan, then you plan to fail" as they say. By "they" I mean about a zillion people. But some attribute this exact quote to Harvey MacKay.


Some of my guitar students have expressed to me the frustration of not improving after hours of work on a song, technique or exercise. In some, very few cases, these frustrations are due to what physical trainers call "the hump". Getting over it takes discipline and resolve. What one is doing is maxing out his or her physical capacity to perform.

But I don't think the "getting over the hump" theory is what prevents most people - and most guitarists - from improving.

I think the real challenge - the real hurdle - is a lack of planning - or not knowing how to plan - in order to succeed. Developing a plan isn't always easy - especially for young players - but with a little practice, everyone can improve his skills on guitar.

There are two things I want to touch on here as we really get in to what a "guitar playing improvement plan" can look like:
1. Continue to practice everything you've learned.
This is hard to do, but for anyone who has played for more than about a year, you really need about an hour of playing five days a week in order to continue improving. Half of that time ought to be practicing what you already know. The remaining 30 minutes ought to be skills you're developing. Yes, I'm talking 60 minutes a day. That's five hours of guitar a week. (Cut back on Call of Duty, please.)

Here's one suggestion for your 30-minute daily reviews:

Day 1: Pentatonic scales and exercises
Day 2: Bar chords and inversions
Day 3: Major and natural minor scales and exercises
Day 4: Arpeggios (major, minor, augmented, half- and fully-diminished 7th chords)
Day 5: Harmonic and melodic minor scales and exercises
2. In order to pass "the hump", athletes and musicians have to increase their capacity by focusing on their weakest links.
For me, this applies really well to rock climbing. It's simple: if I focus only on the types of climbs that I'm good at and like to do, I'll never be a great all-around climber. If I'm a great slab climber and I choose not to work on finger strength on over-hanging routes, I'll never be able to climb over-hanging routes.

On guitar, maybe you hate scales because you suck at alternate picking. Well, you'll never be able to play those quick lead/solo lines well. Want to learn that Jimmy Page solo in "Black Dog"? Not gonna happen without some serious practice on your weaknesses. You know where this is headed...

So how do you know where you're playing is weakest?

Time to eat humble pie, folks. You need to play with people who are better than you. They don't have to be guitarists - just better musicians.

Let this be duly recorded:

If you are in a band and you don't think to yourself at every rehearsal "What a privilege! I get to play with musicians who are better than me every week", then you need to quit and find a new band.

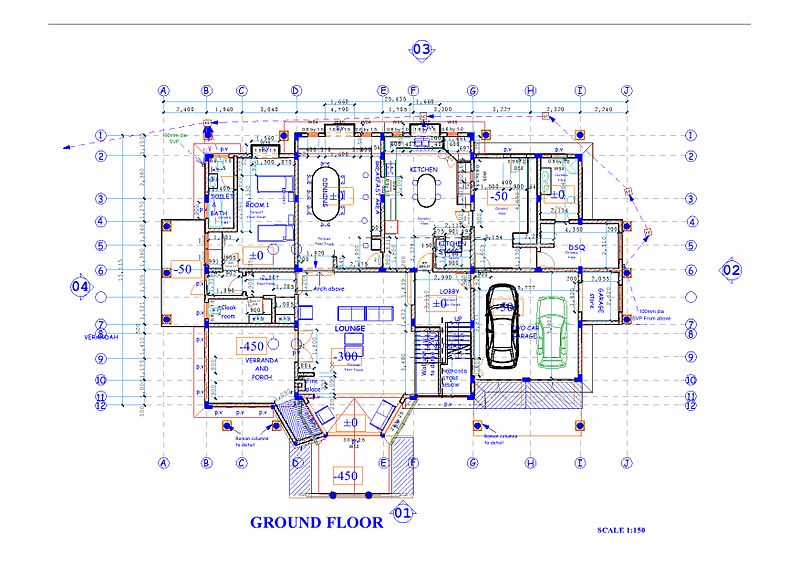
Photo credit: http://commons.wikimedia.org/wiki/File:Housee_BLueprint.jpg

Friday, December 7, 2012

Lesson 1b: Picking Technique and Open-String Exercises

One of the toughest things about starting to learn guitar is gaining control and accuracy of your right hand - both single-note picking and strumming chords (if you're learning on a right-handed guitar, that is). In my first lesson, if we have time after covering the parts of the guitar (lesson 1a), we dive right in to playing the guitar.

Not particularly musical or fun, but fundamental. Open-String exercises are helpful to new students in a few ways:

1. The student gets comfortable holding the guitar and practicing good posture.
2. The student begins to develop right-hand precision - getting a feel for the spacing between each string - which will help with playing scales and strumming.
3. The student is practicing ear-training from day one (that means the student is beginning the process of being able to know what each note of the guitar sounds like and what the relationship is from one string to the next.)
4. The student begins to practice playing even, or steady, rhythms - necessary to play any form of music on any instrument.

But before getting into actually playing these exercises, we have to talk about two things:

1. How to hold a guitar pick. Flip your right-hand index finger straight out and completely flat, palm-side up. With your other hand, place the pointy corner of the guitar pick on your index finger, make sure that about 1/4 inch of the pick sticks out over the end of your index finger (like an extension of your nail), then quickly "snap" your right-hand thumb on to the pick comfortably. That's it!

2. Rule*: Use Alternate Picking. Alternate picking means using an alternating "down then up then down etc." motion when playing each note or chord. If your first note is played by picking down (approaching the string from above and striking it down toward the ground), then the next picking stroke should be up (the opposite of the last). Always "down, up, down, up" when we're working with steady rhythms (IE: the rhythmic value of each note is the same).

*Every week or so I add a new key rule or principle for students to memorize. Most of the time, it's the absolute, bear essential piece of information a student has to walk away from a lesson with.

Here is the worksheet I often use with my students. Remember, it's all open strings, so pretty much all students can get started with this right from the first lesson. No chords to learn or worry about. Easy peasy.


Disclaimer: All resources on this blog are intended for personal use only. If you are a music instructor - public or private - and would like to use some of the resource materials I have created, please contact me to get permission before using them with your own students.

Wednesday, September 5, 2012

Buying Acoustic Guitars over $1,500


This post is a continuation of a series I've been doing on how to buy a guitar. You can read the other posts here:


Acoustic Guitars over $1,500

Now we're getting into the really good stuff. Once you hit this level, you're looking for hand-crafted instruments only, built right here in the US of A or Canada. I don't personally know of any premium quality guitar makers outside of the States or Canada. In this price-range, it's all up to personal preference regarding body style, tone quality, types of wood used, etc.

Personally, I prefer Gibsons uber alles (over all others). Next come Martins, then it's a toss-up between Seagulls and Taylors. I prefer the sound of Seagulls, but the Taylors appear to retain their value better. Remember, though, there are a lot more Taylors on the market right now, so conceivably that could mean they'll be worth less over time - which is not what you want when you're paying this kind of cash.

Guitars in this price-range - and especially over about the $2,500 threshold - are instruments that ought to appreciate in value over time. You aren't just buying a guitar - you're buying an investment. (And that means get it insured! Standard renters or homeowners policies often don't cover these items and require an additional rider.)

This price-range also means that you can seriously consider buying "used" - or as collectors say "vintage". The key here is to do your homework. Find out the make, model, and year of the guitar you're looking to purchase and then find out if the manufacturer fudged on quality or materials during those years, etc.

Go with your gut. If the instrument feels and sounds great, buy it. In some cases, you should do "blind" playing tests to see which ones you like best.

For vintage instruments, I steer clear of Craigslist, Ebay, and other online shops. I also steer clear of big-box retailers like Guitar Center and Sam Ash - especially in Chicago. (I actually don't buy anything from Sam Ash - ever.)

I go with guitar shops that specialize in vintage gear. And unfortunately, there aren't many like that in the Chicago area. Your best bet for vintage is to take a trip South. Make a weekend out of it. Go to Nashville. Even Guitar Center in Nashville has a killer vintage section (this is the only time I'd still consider a big shop for my purchase).

I don't have any specific shops in Nashville to recommend to you at the moment, but if you're serious about making the trip, I have a handful of musician friends who live down there and I'd be happy to get a few recommendations from them.

In addition to snagging a killer vintage instrument, there are other, great reasons for making the trip just to buy a guitar: the experience will be unforgettable, the prices are cheaper than Chicago (because of the high number of vintage pieces available), the variety is greater (you get to try out a ton of guitars before you decide what to buy), you'll meet and network with real musicians in Nashville.

Questions? Comments? Need to contact me? Visit my Guitar Lessons site and email away!

Sunday, April 1, 2012

Top 10 Practice Tips: Build on the Basics (7 of 10)

Photo source: http://en.wikipedia.org/wiki/File:Lego_Color_Bricks.jpg
It's important to stay sharp on the basics. My first guitar teacher, Jack Hammond, once told me that, in order to maintain my current skill level, I needed to practice at least 30 minutes a day. Those 30 minutes would be filled with the basics: scales, chords, arpeggios, right-hand technique, and sight-reading. Now, that was a long time ago, and I would certainly say today that I have to practice much more than that - daily - to maintain my skill level - probably closer to somewhere between 60 and 90 minutes plus.

When I say "the basics," here's exactly what I mean:
  • Major and minor pentatonics
  • 7-Tone major and natural minor scales
  • Harmonic, melodic, and jazz melodic minor scales
  • One-Octave mixolydian and dorian box patterns
  • At least one diminished scale with all box patterns
  • Major and minor arpeggios
  • Major and minor inversions, including drop-2 and -3 voicings
  • Maj7, dom7, and min7 chord inversions, including drop-2 and -3 voicings
  • Sight-reading in both rock (or jazz) and classical styles
  • Strumming patterns practice and finger-picking methods
Why are the basics so important? Simple: they're the building blocks for everything else you'll learn on guitar. Without them, a guitar would just be a wooden stick with a few strings, attached to a hollow box. These techniques get you in the door, if you will - get you invited to the party. When somebody is serious when he or she says "I play guitar", this is what the person is talking about. These are the skills the person is talking about.

Wednesday, March 7, 2012

Lesson 1a: The Parts of the Guitar

My first lesson always includes a section on the anatomy of the guitar. Why? Because every guitarist ought to be able to converse intelligently with other guitarists about the instrument they love. And, if you don't know your own instrument, no self-respecting musician is going to take you seriously. Now, you probably already know that electric and acoustic guitars look different. True. And that means they have different parts. Many are the same, but enough are different that I use two different diagrams, depending on which type a student brings to his or her first lesson. Here, I have included my acoustic guitar sheet.

For some of you, this might be a refresher. Or, you might just learn something new. For others, this is totally new. Take a look for yourself...


Disclaimer: All resources on this blog are intended for personal use only. If you are a music instructor - public or private - and would like to use some of the resource materials I have created, please contact me to get permission before using them with your own students.

Wednesday, January 25, 2012

From the Beginning...

I've decided to begin posting my entire guitar lessons curriculum to this blog, starting at the very beginning - what I do at lesson #1, and how I proceed. I hope that this blog can become a resource for other teachers, improving their own teaching methods. And I hope that these posts benefit learning and eager guitarists (and aspiring ones) everywhere to improve their game, get stoked about the instrument, and learn music theory, too. First curriculum post coming soon...

Wednesday, December 28, 2011

What to Do When You Forget Your Notebook

http://commons.wikimedia.org/wiki/File:Lost.jpg
I can't tell you the number of times that a student has forgotten his or her notebook at my studio after a lesson. It happens all the time. And, embarrassing as it may be, it's even more embarrassing to show up to your next lesson totally unprepared because you couldn't remember what to practice.

So what should you do if you forget your lessons notebook?

Call your teacher immediately. If it's me, just give me a buzz and leave a message, if you have to. Most likely, I'm in the middle of another lesson, a gig, or a recording session. In any case, call as soon as you find out you left it.

Practice what you can remember immediately following your lesson. If it's impossible for you to pick up your notebook right away, it's really important to practice as soon after your lesson as possible. Doing so helps to solidify all of the new content from your recent lesson.

Arrange a pick-up time ASAP. This one is pretty obvious.

Call if you have questions. Okay, yeah, you forgot your notebook. Yeah, it was a stupid thing to forget. But it would be even stupider to not practice because you couldn't remember what you worked on in your lesson. If I'm you're teacher, you can always call and ask questions.

All teachers do things differently, but I like to try to make myself available to my students via phone or email throughout the week, just in case they have questions about their homework. Give me a call. Let's try to work it out over the phone.

In some cases, I have also been known to hand-deliver forgotten notebooks to students. Again, not standard protocol, but I do it every once in a while, if I have the time and I have your address.

Thursday, July 14, 2011

Top 10 Practice Tips: Take a Break (6 of 10)

I've been around classical musicians at college conservatories long enough to know the number one way to derail a quickly progressing music career: practicing too much. That's right. I've said it. But it's not exactly what you think. The real issue is not how much one practices, but for how long one practices without taking a break. The rule of thumb that I follow myself, and that I have been instructed to follow by my own college professors was five minutes off for every 35 minutes of practicing - no matter what.

It's important to remember, too, that I'm not just talking about rehearsing, because we all know that at least a third of the time in rehearsal we guitarists probably aren't playing. In a jazz big band setting, for example, guitarists are lucky to play 50% of the time. What I'm talking about with the 5:35 is 35 minutes of sustained practice: scales, chords, arpeggios, finger-picking technique, etc.

Don't over-do it, and don't think you're invincible. I've seen a ton of string players lose weeks of playing time because they aren't following a strict diet of break-taking during rigorous practice sessions.

Image courtesy of Wikipedia: http://en.wikipedia.org/wiki/File:Carpal-Tunnel.svg

Tuesday, July 12, 2011

Learning Resources and Materials

Beginning guitar lessons for the first time can be an intimidating process. Sometimes the first, few lessons don't go as well as you would have hoped. Don't give up! In order to give you the best possible odds of success, I have done quite a bit of research on a handful of products that are pretty much essential for any beginner guitar student.

For my own students, I require them to purchase two items after their second lesson: a spiral-bound staff paper notebook and a metronome. I have also put together a Lessons Resource Kit, which students can purchase from me for $32. The Kit includes my hands-down, favorite staff paper notebook, metronome, and string winder. This takes the guess work out of having to buy these things on your own, not really knowing what you're looking for.

Here are my top product picks for students, including the items in my Lessons Resource Kit (items with a *):

Best Metronome: Korg MA-30*
http://www.korg.com/MA30
Volume adjustment, subdivisions, two tones, tap tempo, and reference pitches that you can tune to. For the functionality, reliability, and price, this guy is hard to beat.

Best Staff Paper: Standard Wirebound Manuscript Paper (Green Cover)*
http://www.halleonard.com/product/ viewproduct.do?itemid=210005&lid=0&menuid= 718&subsiteid=68&
Simple, easy to write on, good spacing between lines and staves, a good number of pages and durable. A good balance between price and quality.

Best String Winder: Dunlop Pegwinder 100*
http://www.jimdunlop.com/ product/dunlop- stringwinder
Again, simple steals the show. Over the years, I have seen all sorts of complicated devices that claim to improve the process of putting new strings on a guitar. The reality? It's a cumbersome task no matter what winding device you use. In my experience, bigger is not better - but far worse, in fact. I go with this trusty, little tool - one of the originals that Dunlop has been selling for at least 20 years.

Best Capo Ever: SHUBB Deluxe Capo
http://www.shubb.com/deluxe/index.html
It's pricey, but I have yet to find a capo that works better. The biggest complaint with capos is that they change the tuning of the strings, making them slightly sharper than the open position notes. This capo can be adjusted to fit the exact thickness of any neck, at any position.

Best Value Capo: Kyser Quick-Change Capo
http://www.kysermusical.com/product.php?productid=16133&cat=265&page=1
Easy to use. A no-frills design.

Best Acoustic Guitar Strings: Martin SP 80/20 Series
http://www.martinguitar.com/strings/choosing.php?typ=Martin%20SP
I used to use Elixir's coated strings, but I always hated the way the coating shredded off of the strings where the pick hits them, right around the sound hole. I switched over to these strings about three years ago and never looked back.

Best Electric Guitar Strings: D'Addario XL Nickel Round Wounds
http://store.daddario.com/category/145800/EXL115_BluesJazz_Rock_11-49
This is the only string I have played on that can handle a two-step string bend (ala Stevie Ray Vaughan). Every other string that I have used has broken under this very high tension. I have been using these puppies ever since I got my first electric.

Best Guitar Cable: Monster Cable's Monster Rock Series
http://www.monstercable.com/productdisplay.asp?pin=2307
Performers and studio musicians have to be very careful about which cables they choose to use in professional applications. Using a sub-par cable could result in unwanted radio/wireless signal interference. Ever hear a radio station through your amp when your guitar is plugged in? Try upgrading your cables. Best of all, Monster Cable has a *lifetime* warranty. They'll replace any cable, given that it hasn't been abused. A decent alternative would be Monster Cable's S100 series, but beware, I have had interference problems with these lesser-quality cables.

Tuesday, February 9, 2010

Speed Bursts

Sweetwater, an online retailer of music equipment, just recently started this blog about all things guitar. This morning, I opened my inbox and alas! what did I find? It was their latest newsletter, with a pretty cool exercise for increasing your picking speed. They call it "Speed Bursts", and you can check out the whole article on their site:

http://guitarsandgear.sweetwater.com/2010/02/technique-speedbursts/

Thursday, January 28, 2010

Top 10 Practice Tips: Sing While You Play (5 of 10)

I've heard it said that if you can't sing it, you can't play it. And when it comes to improvisation, I think this is a true statement. By vocalizing the pitches you want to play - before you play them - you train your ears and fingers to work together. The more you practice scales - and the more you sing them while you play them - the better you'll get at soloing. Probably one of the coolest artists I've ever heard using this technique is John Pizzarelli. Check him out.

Friday, December 18, 2009

How to Restring a Guitar

I just found this great video, produced by Musician's Friend, on how to restring a guitar. He mentions one of my favorite tips: curling the string around itself, up at the tuning peg, to lock the string in to place. Check it out here:

http://www.musiciansfriend.com/mediacenter?ch=hc&cat=Instructional&vid=DAddario_Restring_acou_les&playlist=instructional&src=3NL9MI2&ZYXSEM=0

UPDATE: 2/8/2013

Unfortunately, Musicians Friend's videos require Flash, which means you have to watch this video on a computer or tablet that allows Flash. When you follow the link, be sure to watch the Telecaster video to see the "string locking method" of wrapping the string back around itself so that it doesn't slip off the post.