Showing posts with label jay mathes curriculum. Show all posts

Saturday, August 16, 2014

Scale Identification Practice

Source: http://www.learn-classical-guitar-today.com/images/NotesOfTheGuitar_ALL.jpg

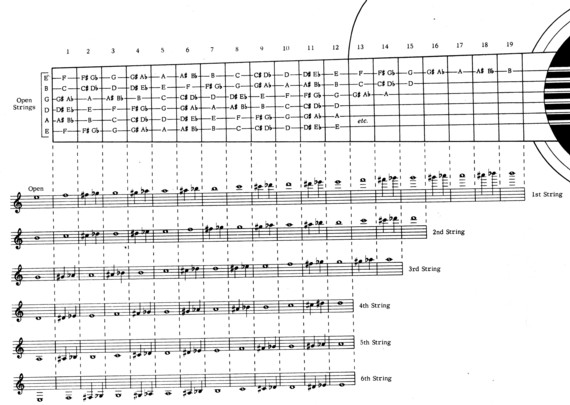
Some of my students right now are working on some really important skills that will help them better play music with others, write songs, or just plain understand the guitar as a whole. Being able to identify, locate, and play scales all over the neck is an essential part of playing guitar.

When it comes to honing this skill, nothing does the job better than randomly calling out fret/position numbers, keys, forms, or finger roots. It's difficult to make sure you cover it all (all forms in all keys), and it might not even be necessary; but the important things are being able to proficiently "use your dots" as a tool to quickly locate root notes, then, identify form root fingers, and recall the forms themselves. If you were to practice your way through every variable in this exercise, you'd play a over 300 scale patterns, total!

To help you practice, I've created a nice little worksheet which you can download. It's pretty straight forward. All you do is fill in the blanks. Once you get the hang of this sort of thing, you should be able to fly. And, you can easily create your own worksheet to get through all 12 keys in all 5 forms, both major and minor, for pentatonics, 7-tone scales, and harmonic minor scales, varying all five of the blanks on this worksheet!


I'll soon post the answer key.

Saturday, August 10, 2013

C Minor Bar Chords and Inversions

This post is for a former student of mine, Steve, whom I told I would write up this special post for him a few weeks after our last lesson together at JC's Guitars in Saint Charles, IL. (More on my leaving coming in an upcoming post over here.)

This lesson is not for beginners.

The worksheet reads left to right, then down a row, etc.

There are ten minor bar/inversion shapes which follow the pattern for the major ones. Simply locate the thirds within the Major shapes and lower them 1/2 step in order to get the minors. However, shapes 1, 4, and 9 are unique to minors, with 1 and 9 essentially being the same, just one octave apart.

By this point in your training, you understand how to check each chord to make sure each note is ringing properly. You also know how to practice increasing your speed between shapes over time. And, of course, you always use a metronome. My favorite basic metronome app for iOS? Bitcount's Clockwork. But if you're looking for one that will gradually increase in tempo as you rehearse difficult passages, you may want to check out Metronome+ (though I very much dislike apps with in-app purchases) or go with the ridiculously robust Dr. Betotte by S'SWorks and pay $10 up front instead of through in-app purchases, like M+.

One more thing to remember: You have to practice these chords ascending and descending as well as in every position, with different roots.

There are two ways you can practice these (other than the simple straight up and down):

1. Pick a position first. Randomly name a minor chord root. Find the shape that fits your root note and position, plus or minus one fret. Then, play all of the shapes you can with that root note, ascending in order, then descending past your original shape, if possible.

2. Pick a shape first. Randomly name a minor chord root. Find the position which matches the chord and root note which you randomly selected. Then, play all the shapes you can. Maybe this time play the shapes below your starting shape first, then ascend past the original, as high as you can go.

Questions? Comment below.

Happy minor chord playing!


Disclaimer: All resources on this blog are intended for personal use only. If you are a music instructor - public or private - and would like to use some of the resource materials I have created, please contact me to get permission before using them with your own students.

Wednesday, August 7, 2013

Sight-Reading for Guitarists

One of the most important skills a guitarist can possess is the ability to read music.

I've said it. I mean it.

Great guitarists don't need to know how to read music, but well-rounded ones do - especially when it comes to comparing musicians of other instruments. Guitarists are the target of a lot of snobbish derision when it comes to their abilities to sight-read. But if we can read music, then we get the best of both worlds: playing from the heart (without music) and playing with precise calculation and technique (reading music).

I owe a big apology to one of my former guitar students, for whom I was supposed to write this special blog post a few days ago. This one is for Joe.

The attached image can be used for sight-reading in any position. Don't memorize it. When you feel like you're starting to get familiar with the order of the notes, flip the sheet upside down. Voila! It's a new page to practice. Here are the most important positions and keys to start with:
  • I - Keys: C, G, D, A, E, F
  • II - Keys: C, G, D, A
  • IV - Keys: D, A, E, B, F
  • VI - Keys: E, B, F
  • X - Keys: G, D, A, E
As you begin, start by reading a single note at a fairly slow pace. Consider each note head to be the same duration.

You're reading whole notes. When you feel comfortable with single notes, move on to reading two notes at a time. Now you're reading twice the information at one time, and you're reading half notes. I think you get the point. Increase the number of notes you read at a time. Some key benchmarks are as follows:
  • 3-note groupings - reading in 3/4
  • 6-note groupings - reading in 6/8
  • 8-note groupings - reading in 4/4
  • 12-note groupings - reading 4 measures of 3/4 at one time
  • 16-note groupings - reading 4 measures of 4/4 at one time
If you're hungry for more, and you're serious, you can write out your own pages, following mine as an example. In my page, I've limited my notes to C3 up to A4. However, the reading range for guitars goes down to E2 and all the way up to E6, approximately, so if you make your own practice sheets, be sure to utilize all of the pitches in your given fret position. (You won't be able to flip the sheet over when the notes become too familiar to "make" a new sheet, but it will give you the full range for guitarists.)

I have based my sheet on David Hickman's book, Music Speed Reading, which is out of print as of this post. Original copies of Hickman's book are currently fetching $150+ on Amazon.com.

Have any questions or comments? Please use the form below. And good luck!


Disclaimer: All resources on this blog are intended for personal use only. If you are a music instructor - public or private - and would like to use some of the resource materials I have created, please contact me to get permission before using them with your own students.

Sunday, April 14, 2013

Lesson 2: How to Tune a Guitar (Relative Tuning)

Time and again I find guitar students who have no idea how to tune their instruments without plugging in to a guitar tuner. Private guitar teachers: this is your fault!

Usually at some point in the first month of lessons, I will teach all of my students what is called "relative tuning". That is to say, tuning so that the guitar will sound good by itself, without any other instruments playing with it. If you want to play with other musicians, you'll need to tune to "concert pitch", which is a standard tuning which all instruments follow in order to play together, in harmony.

If a guitarist is alone in the woods, can he still play his instrument "in tune" and sound great?

The essence of relative tuning is that each string on the guitar is tuned to properly relate, intervallically, to each other. In music theory terms, the interval between each neighboring string, with the exception of G to B, is a Perfect 4th. String G to B is a Major 3rd.

It's a lot easier to just show you what I mean (as opposed to trying to explain it in words, on a blog). So I'm just going to post my worksheet and let you figure the rest out on your own! If you have any questions or comments, please feel free to leave those below.

Don't forget, here's the link to my... post series on guitar lessons curriculum.


Disclaimer: All resources on this blog are intended for personal use only. If you are a music instructor - public or private - and would like to use some of the resource materials I have created, please contact me to get permission before using them with your own students.

Friday, December 7, 2012

Lesson 1b: Picking Technique and Open-String Exercises

One of the toughest things about starting to learn guitar is gaining control and accuracy of your right hand - both single-note picking and strumming chords (if you're learning on a right-handed guitar, that is). In my first lesson, if we have time after covering the parts of the guitar (lesson 1a), we dive right in to playing the guitar.

Not particularly musical or fun, but fundamental. Open-String exercises are helpful to new students in a few ways:

1. The student gets comfortable holding the guitar and practicing good posture.
2. The student begins to develop right-hand precision - getting a feel for the spacing between each string - which will help with playing scales and strumming.
3. The student is practicing ear-training from day one (that means the student is beginning the process of being able to know what each note of the guitar sounds like and what the relationship is from one string to the next.)
4. The student begins to practice playing even, or steady, rhythms - necessary to play any form of music on any instrument.

But before getting into actually playing these exercises, we have to talk about two things:

1. How to hold a guitar pick. Flip your right-hand index finger straight out and completely flat, palm-side up. With your other hand, place the pointy corner of the guitar pick on your index finger, make sure that about 1/4 inch of the pick sticks out over the end of your index finger (like an extension of your nail), then quickly "snap" your right-hand thumb on to the pick comfortably. That's it!

2. Rule*: Use Alternate Picking. Alternate picking means using an alternating "down then up then down etc." motion when playing each note or chord. If your first note is played by picking down (approaching the string from above and striking it down toward the ground), then the next picking stroke should be up (the opposite of the last). Always "down, up, down, up" when we're working with steady rhythms (IE: the rhythmic value of each note is the same).

*Every week or so I add a new key rule or principle for students to memorize. Most of the time, it's the absolute, bear essential piece of information a student has to walk away from a lesson with.

Here is the worksheet I often use with my students. Remember, it's all open strings, so pretty much all students can get started with this right from the first lesson. No chords to learn or worry about. Easy peasy.


Disclaimer: All resources on this blog are intended for personal use only. If you are a music instructor - public or private - and would like to use some of the resource materials I have created, please contact me to get permission before using them with your own students.

Wednesday, March 7, 2012

Lesson 1a: The Parts of the Guitar

My first lesson always includes a section on the anatomy of the guitar. Why? Because every guitarist ought to be able to converse intelligently with other guitarists about the instrument they love. And, if you don't know your own instrument, no self-respecting musician is going to take you seriously. Now, you probably already know that electric and acoustic guitars look different. True. And that means they have different parts. Many are the same, but enough are different that I use two different diagrams, depending on which type a student brings to his or her first lesson. Here, I have included my acoustic guitar sheet.

For some of you, this might be a refresher. Or, you might just learn something new. For others, this is totally new. Take a look for yourself...


Disclaimer: All resources on this blog are intended for personal use only. If you are a music instructor - public or private - and would like to use some of the resource materials I have created, please contact me to get permission before using them with your own students.